Friday, December 25, 2015

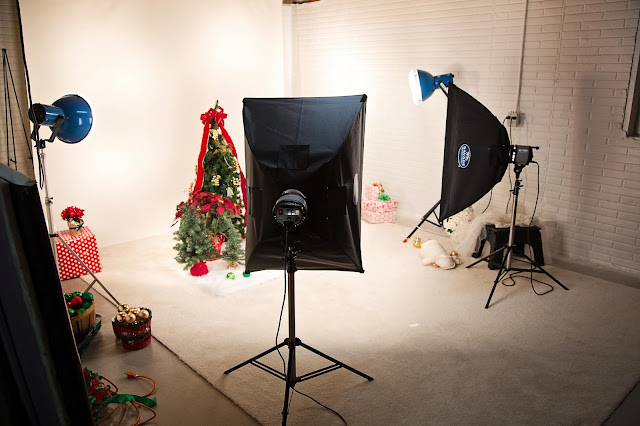
My Home Studio

 
This Christmas, I challenged myself to shoot all Christmas portraits in my studio.
 
I much prefer to shoot with natural light indoors or outside,
but I am grateful to have a studio space right in my basement
for when it's too cold outside for children.
 
 
My studio is a hodge-podge of lights and props I have collected.
 
We are fortunate to have ten foot ceilings in our basement.
We painted the brick-textured walls white, but I wanted a smooth
white background.   I tacked white photographic paper from the rafter above.
You can purchase a roll of this paper online.  I've seen it on Amazon.
 
 
A photographer in our town was retiring, so I bought ALL his lights.
They are older...but I use those blue lights for backlighting.
 
I do not like strobe lights!  I need to see exactly where the light
is falling and for me, the FLASH startles children and adults.
 
I bought the wonderful soft box lights from my photo pal Lucy
and LOVE them!  I can lower or raise the intensity.
They also have a built-in fan to keep them cool as continuous lights get hot fast!
You can find used lighting equipment on Ebay and it's worth considering if you are on a budget.
 
That white carpet used to be in our dining room before we remodeled with wood floors,
so you can see my studio is very make-shift.
 
Here are a few behind-the-scene shots snapped by my niece
as I photographed her beautiful daughter Fiona in the studio.
 
I pay close attention to all the details like getting that hat on just right.
 
 
I always wear WHITE when I shoot portraits
because whatever color I wear, reflects in the subjects eyes!


See the woman standing behind me? That's Fiona's grandma
(My husband's sister.)  You can see where Fi gets her lovely curls!


Next to the studio is my stash of thrift store finds! 
 
 
I have lots of tutus, and basic fluffy clothes that I use over and over.
 
Many times I will go to the thrift store and buy clothing
for a specific shoot.  I then return it to the thrift store.  I am
constantly weeding out!
 
 
Here's the same area from the other direction.
 
I keep my studio extremely organized.
I need to be able to find specific clothing and props immediately!
 
After a shoot, I always return props and clothing to their place
before I edit.
 
 
Behind my row of clothing, I stash my props like baskets,
containers for babies, little beds...etc.
 
I get bored with my props and return them to the thrift store
where I find new props!
 
Here is my beloved collection of cake stands that I made myself
and fake cakes that I use for birthday shoots.
 
In the boxes, are various ceramic pieces I bought for pennies and use for my still-lifes.
Once I'm bored with them, I return them to the thrift store.
 
You can also see my hat collection.
 
 
So you can see, you don't have to spend a ton of money
on studio space.  If you have an extra room in your house or basement space,
you can set up a little studio very cheaply.
 
Just paint the walls white.
That way you can add your own backgrounds in editing.
Plus white walls and ceilings bounce a ton of light!
I never use those awful cloth hanging backgrounds from the 80s.
 
You don't need all my props and clothing...
I just like to style my portraits.
 
Hope this helps you to create a make-shift studio!

Sunday, December 13, 2015

Blowing Snow


A few winters ago, I took this photo of lovely Jessica
on a snowy winter day.
 
We had tried several times to blow real snow, but I
was having no success and it was FREEZING!
 
So, I simply snapped the photo above and added the
blowing snow in Photoshop.
 
 
I wanted to do this again during my holiday portrait shoot with
beautiful Bella.  But this time, I created
a Blowing Snow Overlay that you can purchase
 
Makes it a snap to photograph your subject blowing into
their hands...then add the snow in editing!
 
 
You can actually photograph your subject
indoors in front of a white wall, or
hang a white sheet or blanket.
 
 
Then, you can follow this tutorial to move the
subject to a snowy background.
 
I sell this background here in my Etsy Shop.
 
 
Create a WOW photo quickly and easily!

Sunday, November 29, 2015

Vintage Val Home for the Hoildays

 
Vintage Val is an ongoing series that I photograph with
gorgeous mom of two Valorie!  We have been shooting it
every season for the past two years.  It's a fun, fantasy fling for us...thinking of
locations to tell little stories.
 
The tale this Christmas, Vintage Val returns to her childhood house in:
 
"Home for the Holidays"

 
We got permission to shoot at a wonderful bread and breakfast called
The Montague Inn.  Val and I wish we really lived here!


The amazing coat belonged to my sister's mother-in-law Violet and I was asked
by Violet's daughter if Vintage Val could wear the coat as a tribute to her mother.
 
Isn't it perfect?


Shooting indoors is a challenge, so I am sharing some wonderful lighting tips.
 
I prefer to use natural light whenever possible.
In this next photo, my photo pal Lucy held the reflector for me.
 
We were able to reflect light coming from a nearby window onto her face.
 
I also had Val stand across the room from the lighted tree
and with a larger aperture, thus narrower depth-of-field,
the tree lights turned to beautiful bokeh!

 
But in this next photo with the dark corner, no luck with the reflector.
 
I know it's tempting to think, "Oh, I'll just brighten this up in Photoshop."
 
DON'T! 
 
Take the time to capture the correct exposure.
It will save you a ton of time in editing,
and the photo will not have problems with harsh shadows or extraneous noise.
 
 
So, I used my flash unattached from my camera and tethered by a cord. 
You can also buy wireless remotes.
 
Instead of aiming the flash right at my scene, I had Lucy
angle the reflector and I aimed the flash at the reflector.
 
The light bounced off the reflector creating a much more
natural, softer, diffused light!

 
We used the same technique by the fireplace where there was no window
for reflecting light.

 
Here's a notoriously tricky lighting situation.
 
The camera exposed for the bright window
rendering the rest of the photo dark.
 
 
Here, the reflected flash worked wonders!

 
In this next photo, we used the reflector to bounce the
light from the window back onto Val.

 
When hand holding my camera, I need the shutter speed
to be at least 1/125 to avoid blur.
 
Indoors, this means I must CONSTANTLY monitor my ISO and
crank it up when necessary to
make sure my shutter speed stays fast! 
 
(I know it's a pain to keep checking,but it's much better
 than getting home and finding that most of your photos are blurry! 
YES, that has happened to me!...HORROR!)
 
Another bounced flash photo:

 
In the library, a window on the right side of this photo was casting lovely natural light.
See how her face is heavily shadowed when her face is turned away from the window?
 
 
Whenever possible, have your subject posed towards a
window as in this pretty photo:

 
In this next photo, a gorgeous chandelier was hanging to the left.
You can see Val's shadow on the wall.

 
I tried various angles because I wanted to capture
the sparkly chandelier, but not the shadow.

 
Use the natural light whenever possible.
 
I love the golden lamp light in this photo!
I had her angle her face slightly toward this light.


The natural sunlight coming in from the window is exquisite!

 
I shot this next photo with Val higher on the staircase because
that's where the light was falling.
 
Always LOOK for the light!

 
Further down the stairs where it was darker,
we used the reflector.

 
This lovely window seat was begging for a photo.
But when I exposed for the bright window, the pretty
draperies and Val were too dark.
 
 
In this case,  I bounced the flash off of the white ceiling
and now everything is beautifully exposed.

 
Another case of a bright window in the background
taking over the exposure.
 
 
I took control of the exposure by
bouncing the flash again.

 
She was far enough away from the
tree lights to create pretty bokeh in the background.
I LOVE BOKEH!

 
As I photographed this shoot, I took extra shots so I could
share these techniques with you.
 
You will grow tremendously as a photographer if you will
study and practice these techniques.
 
The payoff for the added attention to light and details is
WORTH IT!!!


Sunday, November 22, 2015

Christmas Card Portraits

 
My studio has been like Santa's workshop in November...
 
BUSY!!!
 
I adore shooting Christmas portraits, so I collect lots of
Christmas clothing and props throughout the year from thrift stores.
 
I always shoot against a white background so I can add my own
bokeh, wallpaper or anything I want!
 
To read how to create a simple white board for shooting CLICK HERE.
 
 
I love to style the photos using my thrift store props.
 
 
The kids really enjoy it, too...especially when they go home with some goodies!
 
You can be extremely elaborate with your sets....or...
 
 
Keep it very simple.


I also love shooting in front of a white board because
it makes it very easy to extract my subject and...
 
 
Move them into an outdoor background!   I sell outdoor backgrounds in my
 
 
That's also what I did with this cute photo of 3-year-old Ila.
This background with the snow-laden trees is in my Etsy Shop .
 
 
Ila is getting a new baby sister in April.  Her parents wanted to
announce the impending arrival in their Christmas card!
 
 
I am having so much fun with the angel wings png I also sell in my Etsy Shop!
 
 
I also sell all the Christmas bokeh backgrounds you see in this blog post in my Etsy Shop.
 
 
Rita from CoffeeShop Blog made this fabulous digital paper
with the red cardinals.  I purposely styled these next two photos
to go with the paper!
 
Rita has made a ton of wonderful new papers, that will be
available for free all through the holidays, so check her blog often.


You can also pick up my Snow Overlay Set in my Etsy Shop.
This set of five exclusive snow overlays are all you will ever need!
 
 
Many times, the simple poses are the best for Christmas cards!
Whenever I photograph people in winter outerwear, I have them wear
gloves or mittens.   It really finishes the look.


I have been doing Christmas card portraits with Miss Emma since
she was born!  She has gotten so good at posing...such a natural.


Here is another one of Rita's pretty holiday papers!
 
 
I love hats and hair flowers!
To learn how to make them, watch my video tutorial.


I hope this gives you some ideas for your own Christmas card portraits!